Hp Photosmart D5160 Wont Feed Cd Tray
Z7_3054ICK0KGTE30AQO5O3KA30N0
hp-concentra-wrapper-portlet
![]() Actions
Actions
Blinking Lights on the HP Photosmart D5100 Printer Series
Blinking lights
The lights on the front of the product can be on, off, or blinking (flashing). The lights indicate product status and are useful for diagnosing printing problems.
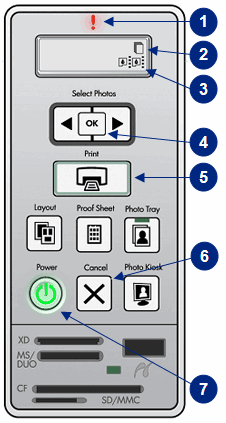
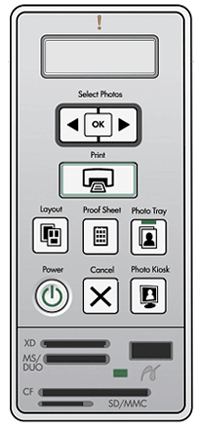
Figure : Lights, buttons, and icons on the product control panel Attention light Paper icon Cartridge icons OK button Print light Cancel button Power light
The following sections describe the most common combinations of blinking lights, followed by solutions for each combination. Find the blinking lights pattern you are experiencing, and then follow the steps to resolve the issue.
Issue: The Attention light and the Print light are blinking and a 'Cd' message flashes on the control panel display
In this error condition, the following light pattern displays on the product control panel:
-
Attention light: Blinking
-
Print light: Blinking
-
Power light: On
Figure : The Attention light and the Print light are blinking and a 'Cd' message flashes on the control panel display
 How do I resolve this issue? The following sections describe the most common messages that display on the computer when the Attention light and the Print light blink and a 'Cd' message flashes on the control panel display. From the following choices, find the message that displays on your computer, and then expand that section for solutions.
A 'CD/DVD Tray is open' message displays on the computer
The Attention light and the Print light are blinking, and a 'CD/DVD Tray is open' message displays on the computer. The product does not print documents or photos.
Cause: The product cannot load paper if the CD/DVD tray is open.
Solution
Close the CD/DVD tray.
Figure : CD/DVD tray in the closed position CD/DVD tray
A 'CD/DVD Tray is closed' message displays on the computer
The Attention light and the Print light are blinking, and a 'CD/DVD Tray is closed' message displays on the computer. The product does not print the CD or DVD.
Cause: The product cannot print a CD or a DVD if the CD/DVD tray is closed.
Solution
Follow these steps to load a CD or DVD into the CD/DVD tray.
-
With the printable side facing up, push the CD or DVD onto the holder until it snaps into place.
Figure : Push the CD or DVD onto the holder

note:
If you are printing on a Mini CD or a Mini DVD, flip the CD/DVD holder ring over until it rests on top of the CD or DVD.
Figure : Flip the CD/DVD holder ring

-
Lower the CD/DVD tray.
Figure : Lower the CD/DVD tray

-
With the CD or DVD facing up, insert the CD/DVD holder into the CD/DVD tray until the arrows on the tray align with the arrows on the holder.
Figure : Insert the CD/DVD holder into the CD/DVD tray

note:
The CD/DVD holder feeds into the product during printing, and might protrude 7.5 cm (3 in) from the rear of the product. Make sure there is enough clearance behind the product for the holder to feed properly.
A 'Printable disc upside-down' message displays on the computer
The Attention light and the Print light are blinking, and a 'Printable disc upside-down' message displays on the computer. The product does not print the CD or DVD.
Cause: The CD or DVD is not properly loaded in the product.
Solution
Follow these steps to load a CD or DVD into the CD/DVD tray.
-
With the printable side facing up, push the CD or DVD onto the holder until it snaps into place.
Figure : Push the CD or DVD onto the holder
note:
If you are printing on a Mini CD or a Mini DVD, flip the CD/DVD holder ring over until it rests on top of the CD or DVD.
Figure : Flip the CD/DVD holder ring
-
Lower the CD/DVD tray.
Figure : Lower the CD/DVD tray
-
With the CD or DVD facing up, insert the CD/DVD holder into the CD/DVD tray until the arrows on the tray align with the arrows on the holder.
Figure : Insert the CD/DVD holder into the CD/DVD tray
note:
The CD/DVD holder feeds into the product during printing, and might protrude 7.5 cm (3 in) from the rear of the product. Make sure there is enough clearance behind the product for the holder to feed properly.
A 'No CD/DVD carrier detected' message displays on the computer
The Attention light and the Print light are blinking, and a 'No CD/DVD carrier detected' message displays on the computer. The product does not print the CD or DVD.
Cause: The CD/DVD holder is not properly loaded in the product, or the product cannot detect the CD/DVD holder.
Solutions
Follow these steps to load a CD or DVD into the CD/DVD tray.
Solution one: Load the CD or DVD into the CD/DVD tray
-
With the printable side facing up, push the CD or DVD onto the holder until it snaps into place.
Figure : Push the CD or DVD onto the holder
note:
If you are printing on a Mini CD or a Mini DVD, flip the CD/DVD holder ring over until it rests on top of the CD or DVD.
Figure : Flip the CD/DVD holder ring
-
Lower the CD/DVD tray.
Figure : Lower the CD/DVD tray
-
With the CD or DVD facing up, insert the CD/DVD holder into the CD/DVD tray until the arrows on the tray align with the arrows on the holder.
Figure : Insert the CD/DVD holder into the CD/DVD tray
note:
The CD/DVD holder feeds into the product during printing, and might protrude 7.5 cm (3 in) from the rear of the product. Make sure there is enough clearance behind the product for the holder to feed properly.
-
If these steps resolved the issue, you do not need to continue troubleshooting.
-
If the issue persists, continue to the next solution.
Solution two: Service the printer
If you have completed all the previous steps and the issue persists, continue to the Service the printer section at the end of this document.
Issue: The Attention light and the Paper icon are blinking
In this error condition, the following light pattern displays on the product control panel:
-
Attention light: Blinking
-
Paper icon: Blinking
-
Print light: Off
-
Power light: On
Figure : The Attention light and the Paper icon are blinking

How do I resolve this issue? The following sections describe the most common messages that display on the computer when the Attention light and the Paper icon blink. From the following choices, find the message that displays on your computer, and then expand that section for solutions.
An 'Out of paper' message displays on the computer
The Attention light and the Paper icon are blinking and an 'Out of paper' message displays on the computer.
Cause: The product is out of paper, or the paper is not properly loaded in the tray.
Solutions
Follow these solutions in the order presented to resolve the issue.
Solution one: Load paper
Choose from the following options to load paper into the product.
Option one: Load plain paper
-
Lift the output tray and the photo tray, and then slide the paper width guide to its outermost position.
Figure : Lift the output tray and the photo tray, and then slide the paper width guide to its outermost position

-
Insert a stack of paper into the tray until it rests against the rear edge of the tray. Then slide the paper width guide inward so that it rests against the edge of the paper.
Figure : Load paper and slide the paper width guide inward

-
Lower the output tray and the photo tray.
Figure : Lower the output tray and the photo tray

-
Press the OK button to continue printing.
-
If these steps resolved the issue, you do not need to continue troubleshooting.
-
If the issue persists, continue to the next solution.
Option two: Load photo paper
-
Lift the output tray to open the photo tray. Press the front latch on the output tray to open it.
Figure : Lift the output tray

-
Locate the paper width guide, and then slide it to the outermost position.
-
Photo tray paper width guide
Figure : Photo tray paper width guide

-
-
With the print side down, insert a stack of photo paper into the tray until it rests against the rear edge of the tray.
Figure : Load photo paper in the tray

-
Slide the paper width guide inward so that it rests against the edge of the paper.
-
Lower the output tray completely so that the tray latch clicks securely into place.
-
Press the Photo Tray button on the product control panel.
-
Press the OK button to continue printing.
-
If these steps resolved the issue, you do not need to continue troubleshooting.
-
If the issue persists, continue to the next solution.
Solution two: Check the condition of the paper, and then reload it
Paper feed issues might result from dusty, torn, wrinkled, wet, or folded paper in the tray. The quality of the paper can also make a difference. Use only good quality paper that meets product specifications. Follow these steps to check the condition of the paper and then reload the paper.
Step one: Check the condition of the paper
-
Remove the stack of paper from the tray.
-
Check for obstructions inside the tray. Use a flashlight to view the mechanism inside the tray to make sure that nothing blocks the paper from engaging with the rollers. Even small pieces of paper can cause paper feed issues.
note:
If you find obstructions in the paper path, skip to the section on cleaning the rollers.
-
Examine the condition of the paper, and then replace any ripped, dusty, curled, wrinkled, or bent paper.
-
Make sure that all the paper in the stack is the same size and type. Never load mixed types of paper in the tray. The product can only process one type of paper at a time.
-
Tap the stack of paper on a flat surface to align the edges.
-
Make sure that the stack of paper contains no fewer than 10 sheets and no more than 25 sheets of paper.
note:
You need to use 10 to 25 sheets of paper only for purposes of these troubleshooting steps. When the issue is resolved, you can resume loading paper according to the paper tray capacity specifications for your product.
Step two: Reload paper
Choose from the following options to load paper into the product.
-
Lift the output tray and the photo tray, and then slide the paper width guide to its outermost position.
Figure : Lift the output tray and the photo tray, and then slide the paper width guide to its outermost position
-
Remove any paper from the tray.
-
Reinsert the stack of paper into the tray until it rests against the rear edge of the tray. Then slide the paper width guide inward so that it rests against the edge of the paper.
Figure : Load paper and slide the paper width guide inward
-
Lower the output tray and the photo tray.
Figure : Lower the output tray and the photo tray
-
Press the OK button to continue printing.
-
If these steps resolved the issue, you do not need to continue troubleshooting.
-
If the issue persists, continue to the next solution.
-
Lift the output tray to open the photo tray. Press the front latch on the output tray to open it.
Figure : Lift the output tray
-
Locate the paper width guide, and then slide it to the outermost position.
-
Photo tray paper width guide
Figure : Photo tray paper width guide
-
-
Remove any photo paper from the tray.
-
With the print side down, reinsert the stack of photo paper into the tray until it rests against the rear edge of the tray.
Figure : Load photo paper in the tray
-
Slide the paper width guide inward so that it rests against the edge of the paper.
-
Lower the output tray. To lower the tray completely, make sure the tray latch clicks securely into place.
-
Press the Photo Tray button on the product control panel.
-
Press the OK button to continue printing.
-
If these steps resolved the issue, you do not need to continue troubleshooting.
-
If the issue persists, continue to the next solution.
Solution three: Clean the paper rollers
Dust, paper fiber, and other debris might accumulate on the paper rollers and cause paper jams and paper feed issues. Follow these steps to clean the paper rollers inside the product.
-
Gather the following materials:
-
A clean, lint-free cloth, or any cloth that will not come apart or leave fibers
-
Distilled, filtered, or bottled water (tap water might damage the product)
-
-
Press the Power button (
 ) to turn off the product.
 -
Disconnect the power cord from the rear of the product.
-
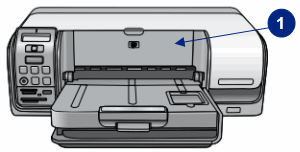
Remove the rear access door by pressing the door latch to the right, and then pulling out the door.
Figure : Remove the rear access door

-
Lightly dampen the cloth with the water, and then squeeze any excess liquid from the cloth.
-
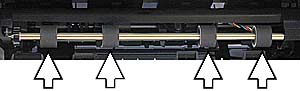
Press the cloth against the rollers and rotate them upward with your fingers. Apply a moderate amount of pressure to remove dust or dirt buildup.
Figure : Rotate the paper rollers
-
Allow the rollers to dry for 10 to 15 minutes.
-
Reattach the rear access door by inserting the right side of the door into the rear of the product, and then pushing the door inward until it snaps into place.
-
Reconnect the power cord to the rear of the product.
-
Press the Power button (
) to turn on the product.
A 'Paper jam' message displays on the computer
The Attention light and the Paper icon are blinking and a 'Paper jam' message displays on the computer.
Cause: The product has a paper jam.
Solutions
 Important: You must follow these solutions in the order presented to resolve the issue.
Solution one: Restart the printer
Follow these steps to try resetting the print mechanism by performing a product restart.
Step one: Restart the printer
-
Press the Power button (
) to turn off the product. If the product does not turn off, continue to the next solution. -
Wait 60 seconds.
-
Press the Power button to turn on the product.
note:
The product might go through a brief warm-up period. Wait until the warm-up period completes before continuing.
Step two: Print a self-test report
Print a self-test report to make sure that the hardware functions correctly.
-
Make sure that plain white paper is loaded in the input tray.
-
Press and hold the OK button.
-
Press and release the Left Arrow button (
 ).
). -
Release the OK button. The self-test report prints.
-
If these steps resolved the issue, and the test page prints, there is no need to continue troubleshooting.
-
If the issue persists, continue with the next solution.
-
If the test page does not print, continue with the next solution.
Solution two: Clear the paper jam
Follow these steps in the order presented to clear any jammed paper from the product. Always clear jammed paper from the rear of the product first, and then from the front.
Step one: Remove loose paper from the tray
Remove any loose sheets of paper from the input tray and the output tray.
caution:Do not remove jammed paper at this stage. Trying to clear jammed paper from the front of the product can damage theprint mechanism.
Step two: Clear the paper jam from the rear of the printer
Follow these steps to clear any jammed paper from the rear of the product.
-
Press the Power button (
) to turn off the product. -
Disconnect the power cord from the rear of the product.
-
Disconnect the USB cable from the rear of the product.
-
Remove the rear access door by pressing the door latch to the right, and then pulling out the door.
Figure : Remove the rear access door
-
Carefully remove any jammed paper and bits of torn paper from the rollers inside the product. Use both hands to pull whole sheets of paper to avoid tearing them.
note:
Use a flashlight to thoroughly check the rollers and wheels for torn pieces of paper. If any torn pieces of paper remain inside the product, more jams are likely to occur.
-
Reattach the rear access door by inserting the right side of the door into the rear of the product, and then pushing the door inward until it snaps into place.
Step three: Clear the paper jam from the front of the printer
Follow these steps to clear any jammed paper from the front of the product.
-
Open the top cover.
Figure : Open the top cover

-
Carefully remove any jammed paper and bits of torn paper from the rollers inside the product. Use both hands to pull whole sheets of paper to avoid tearing them.
note:
Use a flashlight to thoroughly check the rollers and wheels for torn pieces of paper. If any torn pieces of paper remain inside the product, more jams are likely to occur.
-
Close the top cover.
-
Reconnect the power cord to the rear of the product.
-
Press the Power button (
) to turn on the product.
Step four: Make sure that the carriage moves freely
Follow these steps to make sure that the carriage moves freely.
-
Press the Power button (
) to turn on the product. -
Open the top cover. The carriage might move to the access area. Wait until the carriage is idle and silent before proceeding.
Figure : Open the top cover
-
With the product turned on, disconnect the power cord from the rear of the product.
warning:
You must unplug the power cord to move the carriage by hand to avoid the risk of electrical shock.
-
Carefully remove any paper or objects that might be restricting the carriage.
note:
Use a flashlight to thoroughly check the inside of the product. If any torn pieces of paper remain inside the product, more jams are likely to occur.
-
If the carriage is NOT on the right side, push the carriage to the left side of the product.
caution:
Do not attempt to manually move the carriage if it stopped at the far right side of the product. Moving the carriage from this position can damage the product. Skip to the step to Print a self-test report.
-
Make sure that the carriage can move freely across the width of the product by gently pushing the carriage to the left, and then to the right.
-
Close the top cover.
-
Reconnect the power cord to the rear of the product.
-
Press the Power button (
) to turn on the product.
Step five: Print a self-test report
Print a self-test report to make sure that the hardware functions correctly.
-
Make sure that plain white paper is loaded in the input tray.
-
Press and hold the OK button.
-
Press and release the Left Arrow button (
). -
Release the OK button. The self-test report prints.
-
If these steps resolved the issue, and the test page prints, there is no need to continue troubleshooting. Reconnect the USB cable, and then try to print again.
-
If the issue persists, continue with the next solution.
-
If the test page does not print, continue with the next solution.
Solution three: Clean the paper rollers
Dust, paper fiber, and other debris might accumulate on the paper rollers and cause paper jams and paper feed issues. Follow these steps to clean the paper rollers inside the product.
Step one: Clean the paper rollers
-
Gather the following materials:
-
A clean, lint-free cloth, or any cloth that will not come apart or leave fibers
-
Distilled, filtered, or bottled water (tap water might damage the product)
-
-
Press the Power button (
) to turn off the product. -
Disconnect the power cord from the rear of the product.
-
Remove the rear access door by pressing the door latch to the right, and then pulling out the door.
Figure : Remove the rear access door
-
Lightly dampen the cloth with the water, and then squeeze any excess liquid from the cloth.
-
Press the cloth against the rollers and rotate them upward with your fingers. Apply a moderate amount of pressure to remove dust or dirt buildup.
Figure : Rotate the paper rollers
-
Allow the rollers to dry for 10 to 15 minutes.
-
Reattach the rear access door by inserting the right side of the door into the rear of the product, and then pushing the door inward until it snaps into place.
-
Reconnect the power cord to the rear of the product.
-
Press the Power button (
) to turn on the product.
Step two: Print a self-test report
Print a self-test report to make sure that the hardware functions correctly.
-
Make sure that plain white paper is loaded in the input tray.
-
Press and hold the OK button.
-
Press and release the Left Arrow button (
). -
Release the OK button. The self-test report prints.
-
If these steps resolved the issue, and the test page prints, there is no need to continue troubleshooting. Reconnect the USB cable, and then try to print again.
-
If the issue persists, continue with the next solution.
-
If the test page does not print, continue with the next solution.
Solution four: Reset the printer
Sometimes a paper jam error persists even though there is no jammed paper (false paper jam). Follow these steps to perform a power reset to try clearing a false paper jam error.
Step one: Reset the printer
-
With the printer turned on, disconnect the power cord from the rear of the printer.
-
Unplug the power cord from the wall outlet.
-
Wait at least 15 seconds.
-
Plug the power cord back into the wall outlet.
-
Reconnect the power cord to the printer.
-
Turn the printer on.
Step two: Print a self-test report
Print a self-test report to make sure that the hardware functions correctly.
-
Make sure that plain white paper is loaded in the input tray.
-
Press and hold the OK button.
-
Press and release the Left Arrow button (
). -
Release the OK button. The self-test report prints.
-
If these steps resolved the issue, and the test page prints, there is no need to continue troubleshooting. Reconnect the USB cable, and then try to print again.
-
If the issue persists, continue with the next solution.
-
If the test page does not print, continue with the next solution.
Solution five: Service the printer
If you have completed all the previous steps and the issue persists, continue to the Service the printer section at the end of this document.
Issue: One or both of the Cartridge icons are blank
In this error condition, the following light pattern displays on the product control panel:
-
Attention light: Off
-
Print light: Off
-
Power light: On
-
Cartridge icon: Blank
note:A blank cartridge icon (
) does not contain the ink symbol, and does not display ink level indicators.
Figure : One or both of the Cartridge icons are blank

Solutions
Follow these solutions in the order presented to resolve the issue.
Important: Before you begin, make sure that the cartridges are compatible with your product.
Purchase replacement cartridges and other supplies from the HP Store or local retailers.
-
If the cartridge is compatible with your product, try the following solutions in the order presented.
-
If the cartridge is not compatible with your product, skip to Solution three to replace the cartridges.
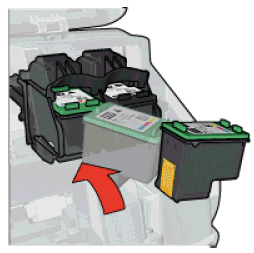
Solution one: Remove and reinsert the cartridge
-
Press the Power button (
) to turn on the product. -
Open the top cover. Wait until the carriage moves to the far right side of the product and is idle and silent before proceeding.
Figure : Open the top cover
-
Press down on the cartridge indicated by the icon on the control panel display to release it, and then pull it toward you to remove it from the slot.
Figure : Remove the cartridge

-
Inspect the cartridge. Make sure that no protective tape remains on the contacts or the nozzles.
Figure : Remove any protective tape from the cartridge

-
Hold the cartridge so that the nozzles face down and the contacts face toward the carriage.
caution:
Do not touch the copper-colored contacts or the ink nozzles. Touching these parts can result in clogs, ink failure, and bad electrical connections.
-
Slide the cartridge at a slight upward angle into its slot, and then gently push it forward until it snaps into place.
Figure : Insert the cartridge
-
Close the top cover.
-
If these steps resolved the issue, you do not need to continue troubleshooting.
-
If the issue persists, continue to the next solution.
Solution two: Clean the cartridges
Follow these steps to clean the cartridge contacts.
-
Gather the following materials:
-
Clean swabs that will not come apart or leave fibers
-
Distilled, filtered, or bottled water (tap water might damage the cartridge)
-
A sheet of paper or a paper towel
-
-
Press the Power button (
) to turn on the product. -
Open the top cover. Wait until the carriage moves to the far right side of the product and is idle and silent before proceeding.
Figure : Open the top cover
-
Press down on the cartridge indicated by the icon on the control panel display to release it, and then pull it toward you to remove it from the slot.
caution:
Remove and clean each cartridge one at a time. Do not leave a cartridge outside the product for more than 30 minutes.
Figure : Remove the cartridge
-
Dip the swab in the water, and then squeeze off any excess water.
-
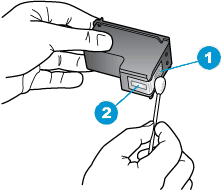
Use the swab to remove any ink and debris from the contacts on the cartridge.
caution:
Do not touch or clean the ink nozzles. Cleaning the nozzles can result in clogs and ink failure.
-
Copper-colored contacts
-
Ink nozzles (Do not clean)
Figure : Clean the contacts
-
-
Place the cartridge on the sheet of paper or paper towel, and allow the cartridge to dry for 5 to 10 minutes. Make sure the nozzles are not in contact with the paper.
-
Hold the cartridge so that the nozzles face down and the contacts face toward the carriage.
-
Slide the cartridge at a slight upward angle into its slot, and then gently push it forward until it snaps into place.
Figure : Insert the cartridge
-
Close the top cover.
-
If these steps resolved the issue, you do not need to continue troubleshooting.
-
If the issue persists, continue to the next solution.
Solution three: Replace the cartridge
Follow these steps to replace the cartridge.
-
Press the Power button (
) to turn on the product. -
Open the top cover. Wait until the carriage moves to the far right side of the product and is idle and silent before proceeding.
Figure : Open the top cover
-
Press down on the cartridge indicated by the icon on the control panel display to release it, and then pull it toward you to remove it from the slot.
Figure : Remove the cartridge
-
Remove the new cartridge from its package, and then carefully remove the protective tape.
Figure : Remove the protective tape from the cartridge
-
Hold the cartridge so that the nozzles face down and the contacts face toward the carriage.
caution:
Do not touch the copper-colored contacts or the ink nozzles. Touching these parts can result in clogs, ink failure, and bad electrical connections.
-
Slide the cartridge at a slight upward angle into its slot, and then gently push it forward until it snaps into place.
Figure : Insert the cartridge
-
Close the top cover.
Issue: The Power light and the Attention light are blinking and a 'Carriage stall' message displays on the computer
In this error condition, the following light pattern displays on the product control panel:
-
Attention light: Blinking
-
Print light: Off
-
Power light: Blinking
Figure : The Power light and the Attention light are blinking
Solutions
Important: You must follow these solutions in the order presented to resolve the issue.
Solution one: Restart the printer
Follow these steps to turn the product off and on again, and then print a self-test report.
Step one: Restart the printer
-
Press the Power button (
) to turn off the product. If the product does not turn off, continue to the next solution. -
Wait 60 seconds.
-
Press the Power button to turn the product on.
note:
The product might go through a brief warm-up period. Wait until the warm-up period completes before you continue.
Step two: Print a self-test report
Print a self-test report to make sure that the hardware functions correctly.
-
Make sure that plain white paper is loaded in the input tray.
-
Press and hold the OK button.
-
Press and release the Left Arrow button (
). -
Release the OK button. The self-test report prints.
-
If these steps resolved the issue, and the test page prints, there is no need to continue troubleshooting.
-
If the issue persists, continue with the next solution.
-
If the test page does not print, continue with the next solution.
Solution two: Clear any jammed paper
Follow these steps to clear any jammed paper from the product. Always clear jammed paper from the rear of the product first, and then from the front.
Step one: Remove loose paper from the tray
Remove any loose sheets of paper from the input tray and the output tray.
caution:Do not remove jammed paper at this stage. Trying to clear jammed paper from the front of the product can damage theprint mechanism.
Step two: Clear the paper jam from the rear of the printer
Follow these steps to clear any jammed paper from the rear of the product.
-
Press the Power button (
) to turn off the product. -
Disconnect the power cord from the rear of the product.
-
Disconnect the USB cable from the rear of the product.
-
Remove the rear access door by pressing the door latch to the right, and then pulling out the door.
Figure : Remove the rear access door
-
Carefully remove any jammed paper and bits of torn paper from the rollers inside the product. Use both hands to pull whole sheets of paper to avoid tearing them.
note:
Use a flashlight to thoroughly check the rollers and wheels for torn pieces of paper. If any torn pieces of paper remain inside the product, more jams are likely to occur.
-
Reattach the rear access door by inserting the right side of the door into the rear of the product, and then pushing the door inward until it snaps into place.
Step three: Clear the paper jam from the front of the printer
Follow these steps to clear any jammed paper from the front of the product.
-
Open the top cover.
Figure : Open the top cover
-
Carefully remove any jammed paper and bits of torn paper from the rollers inside the product. Use both hands to pull whole sheets of paper to avoid tearing them.
note:
Use a flashlight to thoroughly check the rollers and wheels for torn pieces of paper. If any torn pieces of paper remain inside the product, more jams are likely to occur.
-
Close the top cover.
-
Reconnect the power cord to the rear of the product.
-
Press the Power button (
) to turn on the product.
Step four: Print a self-test report
Print a self-test report to make sure that the hardware functions correctly.
How to print a self-test report
-
Make sure that plain white paper is loaded in the input tray.
-
Press and hold the OK button.
-
Press and release the Left Arrow button (
). -
Release the OK button. The self-test report prints.
-
If these steps resolved the issue, and the test page prints, there is no need to continue troubleshooting. Reconnect the USB cable, and then try to print again.
-
If the issue persists, continue with the next solution.
-
If the test page does not print, continue with the next solution.
Solution three: Make sure that the carriage moves freely
Follow these steps to make sure that the carriage moves freely.
Step one: Check the carriage path
-
Press the Power button (
) to turn on the product. -
Open the top cover. The carriage might move to the access area. Wait until the carriage is idle and silent before proceeding.
Figure : Open the top cover
-
With the product turned on, disconnect the power cord from the rear of the product.
warning:
You must unplug the power cord to move the carriage by hand to avoid the risk of electrical shock.
-
Carefully remove any paper or objects that might be restricting the carriage.
note:
Use a flashlight to thoroughly check the inside of the product. If any torn pieces of paper remain inside the product, more jams are likely to occur.
-
If the carriage is NOT on the right side, move the carriage to the left side of the product.
caution:
Do not attempt to manually move the carriage if it stopped at the far right side of the product. Moving the carriage from this position can damage the product. Skip to the step to Print a self-test report.
-
Make sure that the carriage can move freely across the width of the product by gently pushing the carriage to the right, and then to the left.
-
Close the top cover.
-
Reconnect the power cord to the rear of the product.
-
Press the Power button (
) to turn on the product.
Step two: Print a self-test report
Print a self-test report to make sure that the hardware functions correctly.
How to print a self-test report
-
Make sure that plain white paper is loaded in the input tray.
-
Press and hold the OK button.
-
Press and release the Left Arrow button (
). -
Release the OK button. The self-test report prints.
-
If these steps resolved the issue, and the test page prints, there is no need to continue troubleshooting. Reconnect the USB cable, and then try to print again.
-
If the issue persists, continue with the next solution.
-
If the test page does not print, continue with the next solution.
Solution four: Remove and reinsert the cartridges
One or both of the cartridges might not have full electrical contact with the carriage. Follow these steps to remove and reinsert the cartridges.
Step one: Remove and reinsert the cartridges
-
Press the Power button (
) to turn on the product. -
Open the top cover. Wait until the carriage moves to the far right side of the product and is idle and silent before proceeding.
Figure : Open the top cover
-
Press down on the cartridge to release it, and then pull it toward you to remove it from the slot.
Figure : Remove the cartridge
-
Inspect the cartridge. Make sure that no protective tape remains on the contacts or the nozzles.
Figure : Remove any protective tape from the cartridge
-
Hold the cartridge so that the nozzles face down and the contacts face toward the carriage.
caution:
Do not touch the copper-colored contacts or the ink nozzles. Touching these parts can result in clogs, ink failure, and bad electrical connections.
-
Slide the cartridge at a slight upward angle into its slot, and then gently push it forward until it snaps into place.
Figure : Insert the cartridge
-
Repeat these steps to remove and reinsert the other cartridge.
-
Close the top cover.
Step two: Print a self-test report
Print a self-test report to make sure that the hardware functions correctly.
How to print a self-test report
-
Make sure that plain white paper is loaded in the input tray.
-
Press and hold the OK button.
-
Press and release the Left Arrow button (
). -
Release the OK button. The self-test report prints.
-
If these steps resolved the issue, and the test page prints, there is no need to continue troubleshooting. Reconnect the USB cable, and then try to print again.
-
If the issue persists, continue with the next solution.
-
If the test page does not print, continue with the next solution.
Solution five: Plug the printer directly into a wall outlet
Plug the product directly into a wall outlet to make sure that the power source functions correctly.
Step one: Plug the printer into a wall outlet
Plug the product into a wall outlet to make sure that the power source functions properly. If the product is already plugged into a wall outlet, skip to the next solution.
-
Disconnect the power cord from the rear of the product.
-
Unplug the power cord from any power strip or surge suppressor, and then plug it directly into a wall outlet.
-
Reconnect the power cord to the rear of the product.
-
Press the Power button (
) to turn on the product.
Step two: Print a self-test report
Print a self-test report to make sure that the hardware functions correctly.
How to print a self-test report
-
Make sure that plain white paper is loaded in the input tray.
-
Press and hold the OK button.
-
Press and release the Left Arrow button (
). -
Release the OK button. The self-test report prints.
-
If these steps resolved the issue, and the test page prints, there is no need to continue troubleshooting. Reconnect the USB cable, and then try to print again.
-
If the issue persists, continue with the next solution.
-
If the test page does not print, continue with the next solution.
Solution six: Reset the printer
Follow these steps to reset the product, and then print a self-test report.
Step one: Reset the printer
-
With the printer turned on, disconnect the power cord from the rear of the printer.
-
Unplug the power cord from the wall outlet.
-
Wait at least 15 seconds.
-
Plug the power cord back into the wall outlet.
-
Reconnect the power cord to the printer.
-
Turn the printer on.
Step two: Print a self-test report
Print a self-test report to make sure that the hardware functions correctly.
How to print a self-test report
-
Make sure that plain white paper is loaded in the input tray.
-
Press and hold the OK button.
-
Press and release the Left Arrow button (
). -
Release the OK button. The self-test report prints.
-
If these steps resolved the issue, and the test page prints, there is no need to continue troubleshooting. Reconnect the USB cable, and then try to print again.
-
If the issue persists, continue with the next solution.
-
If the test page does not print, continue with the next solution.
Solution seven: Service the printer
If you have completed all the previous steps and the issue persists, continue to the Service the printer section at the end of this document.
Issue: The Attention light blinks
In this error condition, the following light pattern displays on the product control panel:
-
Attention light: Blinking
-
Print light: Off
-
Power light: On
Figure : Issue: The Attention light blinks

How do I resolve this issue? The following sections describe the most common messages that display on the computer when the Attention light blinks. From the following choices, find the message that displays on your computer, and then expand that section for solutions.
Issue: All lights blink
In this error condition, the following light pattern displays on the product control panel:
-
Attention light: Blinking
-
Print light: Blinking
-
Power light: Blinking
Figure : All lights blink

Service the printer
Service or replace your HP product if the issue persists after completing all the preceding steps.
Go to Contact HP Customer Support to schedule a product repair or replacement. If you are in Asia Pacific, you will be directed to a local service center in your area.
To confirm your warranty status, go to HP Product Warranty Check. Repair fees might apply for out-of-warranty products.
Source: https://support.hp.com/ee-en/document/c01041365
0 Response to "Hp Photosmart D5160 Wont Feed Cd Tray"
Post a Comment